Many people like to construct the pineapple block using foundation paper piecing, however if (like me) you're not keen on copying out the foundation patterns, you can make the block using a rotary cutting method. We have a free pattern on the website using a pineapple block, this method is used in the pattern and I've reproduced it below.
a) Cut a 4.75" square of fabric for the centre of the
block. Cut a 2" WOF (width of fabric) strip of your next fabric, and cut off 4
lengths at 4.75" each. Stitch two of the strips to opposite sides of the
square, then press (always press the seams towards the outer strips). Stitch
the other two strips to the remaining two opposite sides and press (figure 1).

Figure 1
b) Using a quilting ruler with 45 degree angles marked, line
up the 45 degree line with one of the seam lines and trim off the corners of
the strips, leaving 0.25" of fabric at the corner. Repeat by rotating the
ruler for each corner. (figure 2).

Figure 2
c) Cut a 2" WOF strip of your next fabric and from it cut 4
pieces approximately 1/2" longer than the trimmed edges of the previous
strips. Stitch these strips to the 4 sides as in step a and press (figure 3).

Figure 3
d) Trim the end corners of the strips to line up with the
short outer length of the fabrics in the previous round - use the lines on the
ruler to ensure the cut edges are parallel with the seams of the centre block (figure
4 & 5).
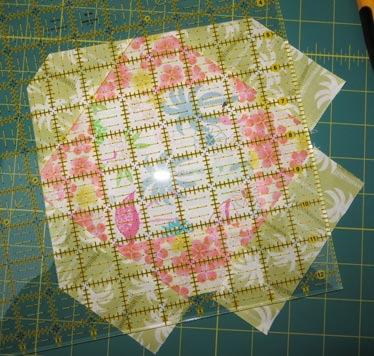
Figure 4

Figure 5
e) Continue in this way for the next 3 rounds, ensuring at every stage that the seams are parallel and the outer
edges square.
f) For the large corner pieces, cut a 4" WOF strip of
your final fabric. To save fabric, instead of cutting a strip, cut a triangle with its base
at about 1" wider than the cut edges of the previous round instead (figure 6). Sew one triangle on to each
corner.

Figure 6
g) Use the ruler to square up the block. Ensure all blocks
are exactly the same size, trim where necessary using your rotary cutting mat
as a guide. The finished blocks should measure approximately 13.75"
square. See figure 7 for an image of the finished block.

Figure 7
h) You can alter the sizes given in this tutorial to make blocks of any size, and you can do as many rounds as you'd like - thin strips and many rounds make a really impressive looking block! This block uses prints from a single collection to coordinate, however a more striking effect can be achieved by alternating dark and light fabrics in each successive round.
Hope this is useful!


No comments:
Post a Comment