Showing posts with label tutorial. Show all posts

Thursday, 16 June 2022

New product guide section launched on website!

We get asked a lot of questions about the products we sell, both at shows and through the website. To try and answer some of the most common ones, we have launched a product guide and tutorial section - we will be adding to this often, so if you have any suggestions for useful guides please let us know! 

The first three guides to be added are as follows:

What size rotary cutter do I need? This short guide explains the various sizes of rotary cutter available and the reasons to use each.


How to use a quilting stencil? This is a simple guide to what a quilting stencil is and how you can use them to transfer complex quilting designs onto your quilt top.


What is a self-healing cutting mat? This is a simple explanation of what the term 'self-healing' means and a few tips on how to keep your cutting mat in tip-top condition.


Friday, 2 September 2016

Rotary cutting method for pineapple quilt block - tutorial

Many people like to construct the pineapple block using foundation paper piecing, however if (like me) you're not keen on copying out the foundation patterns, you can make the block using a rotary cutting method. We have a free pattern on the website using a pineapple block, this method is used in the pattern and I've reproduced it below.

a) Cut a 4.75" square of fabric for the centre of the block. Cut a 2" WOF (width of fabric) strip of your next fabric, and cut off 4 lengths at 4.75" each. Stitch two of the strips to opposite sides of the square, then press (always press the seams towards the outer strips). Stitch the other two strips to the remaining two opposite sides and press (figure 1).


Figure 1

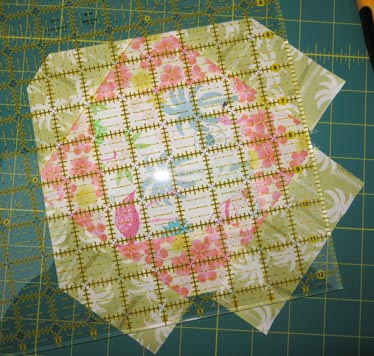
b) Using a quilting ruler with 45 degree angles marked, line up the 45 degree line with one of the seam lines and trim off the corners of the strips, leaving 0.25" of fabric at the corner. Repeat by rotating the ruler for each corner. (figure 2).


Figure 2

c) Cut a 2" WOF strip of your next fabric and from it cut 4 pieces approximately 1/2" longer than the trimmed edges of the previous strips. Stitch these strips to the 4 sides as in step a and press (figure 3).


Figure 3

d) Trim the end corners of the strips to line up with the short outer length of the fabrics in the previous round - use the lines on the ruler to ensure the cut edges are parallel with the seams of the centre block  (figure 4 & 5).


Figure 4


Figure 5

e) Continue in this way for the next 3 rounds, ensuring at every stage that the seams are parallel and the outer edges square.

f) For the large corner pieces, cut a 4" WOF strip of your final fabric. To save fabric, instead of cutting a strip, cut a triangle with its base at about 1" wider than the cut edges of the previous round instead (figure 6). Sew one triangle on to each corner.


Figure 6

g) Use the ruler to square up the block. Ensure all blocks are exactly the same size, trim where necessary using your rotary cutting mat as a guide. The finished blocks should measure approximately 13.75" square. See figure 7 for an image of the finished block.


Figure 7

h) You can alter the sizes given in this tutorial to make blocks of any size, and you can do as many rounds as you'd like - thin strips and many rounds make a really impressive looking block! This block uses prints from a single collection to coordinate, however a more striking effect can be achieved by alternating dark and light fabrics in each successive round.

Hope this is useful!

Friday, 23 October 2015

Collared witch's cloak tutorial - how to make a child's cape to go with a witch's costume!

I've just used our Glow in the Dark fabric to make a little witch's cloak for my 4 year old - as I couldn't find a tutorial online to make exactly what I wanted I decided to wing it, and this is a description of how I did it (complete with a few corrected mistakes!) just in case anyone else wants to try a similar cloak!


First, you need half a metre of your chosen fabric, plus half a metre of a lining fabric. I used Timeless Treasures Glow in the Dark spider webs, with a plain black cotton fabric to line it. You will also need matching sewing thread and a small piece of interfacing for the collar. The cloak I made is ideal for an average sized 4 year old, for taller children just use a larger piece of fabric for greater length.

For the main body of the cloak, leave the fabric folded and mark out a quarter circle with a 1/2m radius (I used a pen and a piece of string for this). Mark out a smaller circle for the neck hole, this is not a critical measurement but it should be small enough that the cloak sits on the shoulders comfortably - I cut round a small saucer approximately 5 inches in diameter for this. The picture below shows how the cut fabric looks at this stage, with the folded edge at the top, when you open it out you will have a semi-circular piece. Repeat the cutting instructions to make a lining piece to the same dimensions (or just lay the already cut piece on top of the lining and cut round it!).


Cut two collar pieces from the left over pattern fabric -  to get the length required measure around the collar circumference and add approximately 1/2 inch (I didn't add the 1/2 inch and ended up with quite a big step between the cloak and the collar, as I didn't take the seam allowance into account).


Cut the collar pieces to this measured length, and to the height you want the collar plus around 1/4 inch - it may be easier to make the height larger than you need as you can always adjust this later. Use the interfacing to stiffen the collar by ironing on to the wrong side of one of the collar pieces.


Place collar pieces right sides together and sew a 1/4 inch seam up the side, along the top and back down. Turn the collar right sides out and then sew a stay stitch line along the bottom at the height you want the collar to be. Cut notches up to the stay stitching to make sewing the collar in easier. Put the collar to one side for now.

Next, pin the cape pattern and lining pieces together right sides together. Pin two lengths of ribbon approximately 1/2 inch down from the neck opening, long enough to tie the cloak closed - make sure you put the long ends of the ribbon inside the fabric sandwich and don't make my mistake and have the long ends on the outside! THE PICTURE BELOW IS WRONG - PUT THE LONG ENDS OF THE RIBBON INSIDE THE FABRIC SANDWICH!


 Sew a 1/4 inch seam down each side and along the bottom omitting the collar (I like to sew the two sides first and then along the bottom instead of going all the way around in one go, as it seems to stop the pieces from wandering). Turn the cloak right side out and press.

Stay stitch 1/4 inch in from the raw edge of the collar - just a straight sewing line all the way around. Clip notches up to the stay stitch line, then fold the raw edges to the inside and press. Take the collar and insert it into the collar opening, then pin in place.


Reverse side of pinned collar:


Sew through all layers along the collar opening approximately 1/8 inch down from the opening. The cloak is now finished!